Roma
"In war, events of importance are the result of trivial causes."
-Gaius Julius Caesar
The Crossing into Turkey
This battle was part of a Conquer The World campaign I played as the Romans. Here is a curious error in Rise Of Nations: the Praetorian Guards only become available in the Gunpowder Age; quite the mistake since the Guard was disbanded in the 4th century. In the Classical Age you simply get 'Legions', and these are upgraded to 'Caesar's Legions' in the Medieval Age.
Another annoyance: when playing a Quick Battle in the Classical Age, you do not have access to supply wagons, though you do in CTW battles. This makes the game almost impossible - the enemy will not venture into your territory, and if you go into theirs, your troops soon die from attrition.
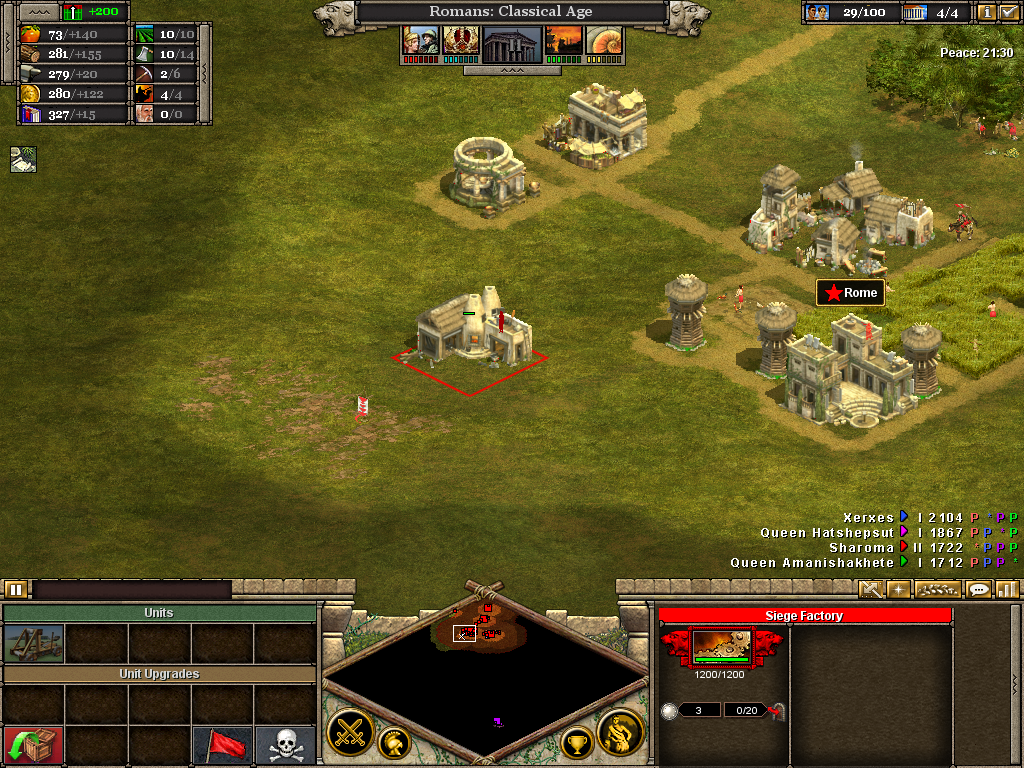
A beachhead has been established in Turkish territory. Advance units are giving battle elsewhere, meanwhile the newly raised 4th Infantry protects its barracks and prepares to move out with its artillery and supporting cavalry.
The artillery of the 4th begins to bombard a fort, whilst the 2nd Cavalry cuts down the baggage train of the enemy, stranded between the 1st and 4th. The 1st is advancing around the rear of a cluster of trees..
The fort is destroyed, leaving the way open for the 4th to throw out a line of battle facing south east. The 1st has advanced up the hill and is destroying the enemy barracks and stables there. However, the 4th finds itself over extended, and lacking support from the 1st, is being pushed back. The Senator is on hand to direct the attack here, but the rear and flanks are exposed. The formations, unable to support each other, will likely be wiped out by a strong Turkish counter thrust.
The 1st Infantry has lost its infantry, and now the goal is to save its artillery, along with that of the 4th. The Senator has retreated, and the 4th has fallen back in reasonable order, despite taking heavy losses. It is now advisable to abandon this attack completely and retreat back to friendly territory, before all eight siege engines are cut off and destroyed. The remnants of the 4th Infantry will fight a rearguard action, since it takes time for artillery to pack up and move out.
The 4th Infantry fought to the last man, but bought time for the artillery to retreat. The 2nd Cavalry, newly raised after losing its entire strength when in combat with the 1st, is given orders to charge directly into the Turkish infantry, who, fresh from the victory, are exposed. The high ground north of the settlement has been lost. The trees provide cover for the retreating remnants of the army.
The 2nd has lost some horses, yet is attempting, with the elements of the 4th, to hold on to the high ground, but this effort is futile and is simply to buy time for replacements to be brought up from the coastal base; without the facilities there, the Romans would likely be driven entirely from the continent.
A fort is being hastily constructed on the edge of Roman territory to push the border further south, as fresh levies are rushing forward to reinforce the depleted, but not yet defeated, formations. The 2nd Cavalry, now a single horse strong, did its duty, and neither side holds the high ground.
Sha·Roma the Senator is back on the frontlines to give heart to the defenders, as they valiantly hold the line against enemy attacks. The fort is almost complete.
The Romans were able to make good their losses quicker than the enemy, and the newly reinforced 1st and 4th Infantry, with auxillary units in reserve, take the high ground and begin to push on to the city.
Corum was easily taken on the second attempt, and to release forces tied up defending it, citizens were brought in to construct forts. These have been garrisoned, and now the enemy, attempting to attack the rear of the Roman forces, are being cut down with ease.
The enemy's line of supply north has been cut, and any attempts to relieve their besieged northern settlement will be thwarted, since the 1st are deployed parallel to the road. As you can see from the minimap, Roman territory is threatening to cut Turkish holdings in two.
Although the enemy are attempting to attack our supply lines (see minimap), they will not be able to reach their capital of Antioch in time to effect a relief. A holding force to the south still holds the road, and two legions close a pincer. The city fell soon after.
Campaigns in Europe
In an attempt to avenge the Sack of Rome in 410, the Romans take the battle into Goth territory. The best way to defend a newly acquired city is to deploy your forces directly behind it. Even a levelled city can continue to absorb fire, and will offer a protective barrier to the forces positioned behind it. When the enemy does come close, they will be under fire as they attempt to get around the city.
Leiden won't last long with this much force thrown against it.
The Praetorians are split, and move in order around the mountain range. 5th Cavalry rushes ahead to take the enemy in the rear. Keep moving forward. Be more aggressive than your enemy!
The flanks of the 1st (not yet up to full strength) here are protected on the left by trees and on the right by a tower. The enemy invasion force is also under coastal bombardment.
Despite destroying a not insignificant amount of enemy forces, thanks to careful management, and cautious advance, the 1st only suffered the loss of two units.
Two corvettes guard the channel as forces are built up and the amphibious invasion is planned. Sloops (or corvettes) are ideal for destroying enemy transports. Keep them spaced apart to maximize the area covered.
10th Fleet is effectively destroyed by vastly superior numbers. Only sloops (or equivalent light ship) are an effective defence against fireships; larger vessels will barely survive a single contact, whereas sloops can withstand at least two. Throw out your sloops ahead of your larger ships, not only to scout, but to offer protection.
10th Fleet (off screen) is reinforced and defending the channel for the imminent invasion. A corvette has discovered a castle defending the intended landing zone.
10th Fleet counterattacks in force!
Although most of the army is assembling for the assault across the ocean, eight units of infantry guard Saturnia in case the enemy makes a surprise attack. Their navy is probing to the north.
The invasion is under way. A bomb ketch reduces the castle, and outside Leicester the Praetorian cohorts are assembling.
All forces are thrown in; there are no reserves on hand, though the navy is still managing to hold the channel, and therefore the supply line, open.
Conquest in Asia
An unlikely alliance with Ghengis Khan will lead to destruction for the forces of Tsar Peter the Great.
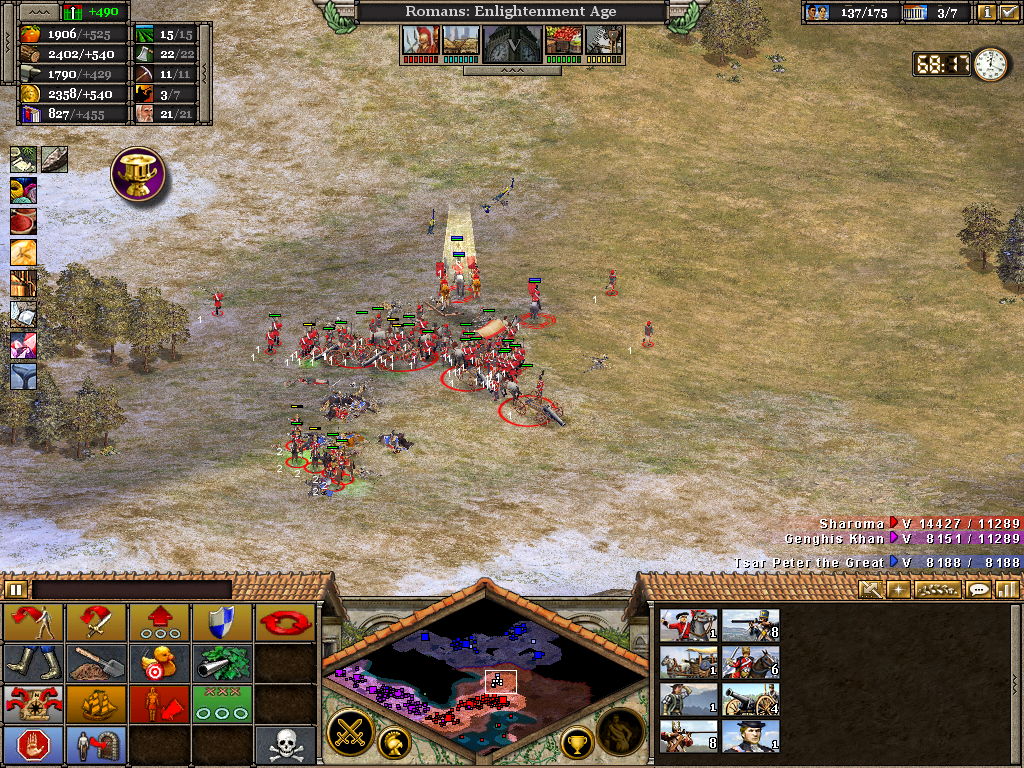
Here we see the main infantry force hiding to the right. It allowed the enemy to pass by, then the 2nd Cavalry attacked the baggage train. With their supply wagons now destroyed, their forces are now suffering attrition, as you can see from the 'red haze' around them. Note the peacocks: always send a merchant to this resource, since it increases your population limit, which allows you to field more troops than your enemy.
After ambushing the enemy with the 2nd Cavalry, the 1st has driven down on the enemy's rear and easily destroyed them. This is how to take care of an invasion force. Hide, let it pass, then strike it in the rear.
Since my favoured method of deployment is lines of infantry and artillery, with cavalry guarding the flanks, I like to set the stance of the cavalry units to 'aggressive', as you can see here. I then keep my infantry units selected, and the cavalry automatically swoop in from the flanks to clear off the enemy and pursue them as they flee. Once their work is done, I reset their stance and fall them back in line.
Once you've acquired all technologies and no longer need your scholars, reassign them as militia. Otherwise, they add to your population without contributing. Since they cannot fight in enemy territory without suffering heavy attrition damage, they make perfect garrison units. In this picture, note the use of trees for protection, and how a cavalry unit guards the right flank until construction of the border forts are completed.
I am making the most of my allies' positioning by using them as a flank guard, whether they are aware of it or not. I've posted my cavalary there, just to be on the safe side, whilst another formation sees action elsewhere on the map.
Khan's forces are attacking Kursk as my forces begin the assault on the Russian capital. 2nd Cavalry once again guards the flanks as the infantry and artillery set to work destroying the enemy's barrack facilities. The line of advance is kept straight and secure.
The enemy is reduced to one city as allied forces close in, attacking each city from at least two angles of advance.
War at Sea with the British
I can't recall why I am fighting in blue here (perhaps I had 'simplified colours' enabled). The Roman forces of the Enlightenment Age face the formidable navy of Queen Mary of England.
10th Fleet guards a large invasion army. Transports are vulnerable to enemy shipping. Nothing is more painful than seeing your defenceless ground troops sunk to the bottom without even firing a shot, so protect them well. Use sloops to protect your larger vessels from fireships. Notice how offscreen a further force of ships screens the channel to detect enemy shipping before the invasion begins.
Offscreen the invasion has begun, but here you see how just two sloops can easily (and swiftly) intercept enemy transports and destroy them.
Along the coast of France I have built a string of Martello Towers, the distance between them sufficient so they can cover the entire coast. Notice how quickly they too can destroy enemy transports, even without a garrison.
This time I am invading Great Britain. The trouble with amphibious assaults is you have to create a large navy to protect your line of supply across the water, but this reduces the amount of ground forces you can dedicate to the invasion itself. It's a balancing act. Once you are sure your beachhead is established and secure, you can reduce the size of your navy or even abandon it all together. Speed is key. Get your troops across and out of the water as quickly as possible! Finding a suitable landing zone can also be difficult, especially when space is limited. If you must land outside a city, make sure to get your artillery deployed and firing at it otherwise you'll find yourself bogged down and unable to move. Bomb ketches can help reduce forts and cities before you land, but this takes time, since the enemy will likely send their navy against you, and you'll find yourself engaged in a sea battle. While that is happening, the enemy will have time to organise a defence on the ground - again, speed is key. Better to just land before the enemy can meet you on the ground, rather than waiting to reduce every single one of their forts, towers and cities.
As you can see, the British wasted no time in mobilising their Royal Navy, and their many fireships will make short work of my navy. Thankfully my forces are all landed, so the enemy can take back the channel for all I care. Once I've taken a city on the British mainland, I can supply my forces from there. I cannot waste the time or resources to retake the sea, and there is no reason to. Maintaining supply lines over water simply isn't worth it.
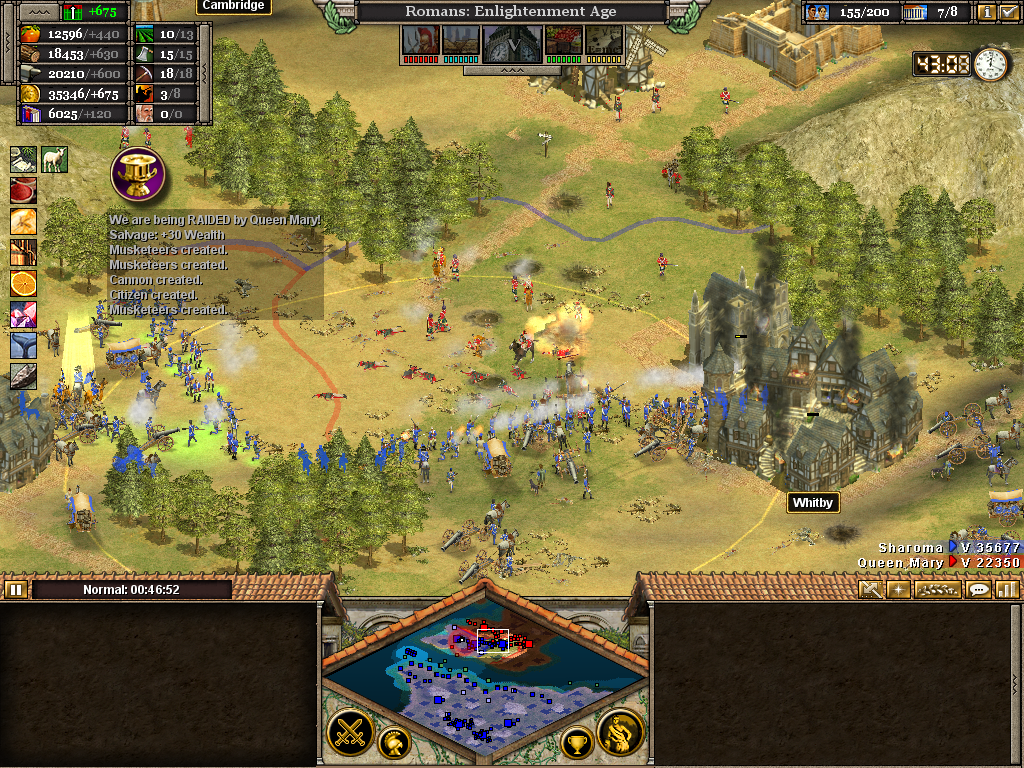
Runnymede is taken. 6th Infantry, at full strength, is ordered to guard the western approach, whilst the 1st and 4th wheel to face east and take care of forces making a counterattck from the direction of London. Enemy scholars are fleeing their captured university. Such was the speed of my attack, the enemy farms are left intact, but I will raze them anyway to make room for barracks, stables and siege factories. The enemy can bombard from the shore on more than one side, so I will make sure to build fortifications and buildings as inland as possible.
The 6th (off screen) makes slow progress north as the 1st and 4th are thrown against London. Now is no time to rest on your laurels. Strike quick before the enemy has time to regroup! Southampton is taken (which should further reduce their naval capabilities) and barracks are targeted to prevent fresh levies appearing. 1st and 2nd Cavalry are barely intact after seeing heavy action during the initial stages of the invasion. Since I haven't had time to build stables yet, they are kept back and are guarding the rear. Southampton protects the infantry's left flank.
The 6th has been reassigned and has joined the main army group - this is to maximise the concentration of force deployed against the enemy in a single sector. Whitby was taken, and the 1st guards the right flanks, as the 4th and 6th deploy as pictured to draw the enemy in. Note how effective this deployment pattern is: enemy fusiliers, the cream of their heavy infantry, are falling, and their corpses litter the battlefield. The British are throwing everything that have at these two regiments and are making zero progress. Britain is being subdued.
Inca
I can't recall exactly where this battle took place, but it is in South America.
Towers are the frontline defence. The second line is my 1st and 4th Infantry. They are entrenched and ready to receive an imminent attack.
Here is as good a place as any to detail how I name/number my formations: 1st [mixed infantry/artillery], supported by the 2nd [light cavalry]; 3rd [light cavalry] supporting the 4th [mixed infantry/artillery]; 5th [light cavalry] supporting the 6th [mixed infantry/artillery]; 7th [mixed infantry/artillery]; 8th Support [usually the Senator/King]; 9th Support [citizens]; 10th Fleet [naval formation].
The enemy has landed, and though the towers are doing their part to help, many troops managed to disembark. The 1st and 4th are ordered to hold the line, and are doing so admirably. The 1st, however, has lots half its heavy infantry.
The artificial intelligence has learned that another invasion route must be found, and as you can see, their transports are instead attempting to land further north, where there is no defence. They have successfully outflanked me.
Conquest in Africa
This was a monumental battle! One of those that took many hours. I systematically destroyed the forces of King Piankhy (Numidians), Queen Cleopatra (Egyptians) and Darius (Persians). Before the battle began, I made this short video.
Two legions hold the high ground as a fort is constructed. Javalineers wait in the rear to garrison it, which will free up the legions to commence operations elsewhere. Persian elephants are a worthy opponent, but attacking across water and uphill, they are easily cut down. This is an excellent defensive position. It commands the area surrounding it, and there is no clear route for the enemy to attack. You can see on the minimap where my original borders lay (by the concentration of towers). The Numidians were vanquished before I started taking screenshots of this battle.
Atfih will soon be taken. 9th Infantry is guarding the flank.
When fighting in enemy territory, you must always protect your supply lines. Here I was unable to, and had to deploy in what I call a 'Fighting V'. One legion continues the advance, whilst another guards its rear. The enemy is hoping to secure the east-west axis but the shields of the 4th are deployed along it. The 3rd Cavalry is harassing their artillery and the 2nd remains in reserve. The enemy was foolish enough to let their drivers wander between my legions, and as a result they have lost five precious supply wagons. With careful deployment, they could have seriously hindered my advance and cut off two entire legions. Instead they have found themselves outmanoeuvred. Inside the Fighting V, artillery of both forces can combine on a single target.
Three legions are thrown at the town of She. Despite attacking across water and uphill, the town will be taken before the enemy has a chance to form an effective defence.
The legions are arranged in a V once again; note how this maximizes their firepower. In the enemy's rear, 2nd Cavalry are set to aggressive stance, and will close the pincer. I like to use my infantry as a 'body', and the cavalry as the 'claws', which swoop in from left and right, rather like a crab. In this particular engagement, the enemy can only field light infantry (javalineers), but they may have reserves close by. My right flank is totally exposed so once the enemy is destroyed immediate redeployment will be necessary.
Partially off screen another enemy city is being taken. In the shot, we see a legion making a quick crossing of the river to take the enemy in the rear and establish a front facing east. The next shot will illustrate this further.
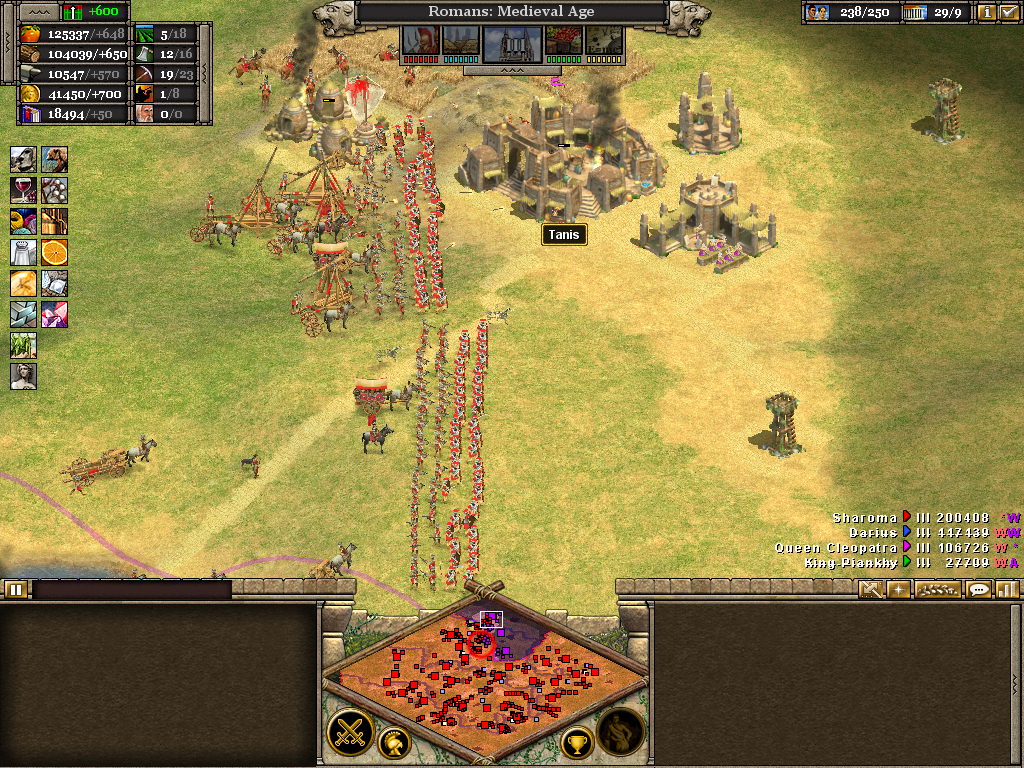
'1st & 4th' | '6th' | '9th' | '7th'
These four shots were taken consecutively. In the first one, we see the 1st laying siege to Tanis, with the 4th in support. I have managed to deploy my legions in a line along a north-south axis, and the enemy, attempting to shuffle forces north to defend their city, face fire from across this entire front. The 4th's right flank is protected by a river; in the second shot we see the enemy King and his General Staff attempting to lead a relief effort. Their supply train is close behind, yet it is travelling directly in front of the 6th's position. In the third shot, the 9th has borne the brunt of the enemy attack, but that's okay, since they too have suffered heavy casualties. Here the Senator (8th Support) is directing the battle. In the fourth shot the 7th are in reserve, illustrating just how much force I have at my disposal. Notice how since their supply train ran ahead, and was destroyed, their javalineers are now suffering from attrition damage.
Spanish Bombs
Legio IX Hispana is supressing a rebellion in Hispania Citerior.
The enemy is massing for an assault; they will soon destroy my only fort in this sector, and just one formation is deployed to meet them, since my own invasion force is off screen to the north.
This is how to build a fort. On high ground, overlooking a river. Fully manned, it is causing the enemy a lot of problems. Such is its rate of effective fire, the enemy are cut down before they can even get out of the water. My forces are being withdrawn to rest and repair.
The line of advance closes up and presses home the final assault. The enemy will never counter such a concentration of force.
Campaign in Germania
Germanicus leads his legions across the Rhine to avenge those lost in the Battle of the Teutoburg Forest (Legio XVII, Legio XVIII, and Legio XIX)...
This was another long battle. I slowly, but surely, overcame first Alaric the Visigoth and then Queen Isabella, who was aiding him. I had to station permanently a full strength legion on my eastern front to keep the Spanish at bay, whilst my remaining forces headed south to wrap up the Germans. It took many hours, but eventually the battle was won, and the Eagles recovered!
The 1st Infantry, with their supporting light cavalry off screen to the right, manned this frontier for the duration of the battle. Their only support was in the form of two contingents of javalineers, who garrisoned the two forts. Citizens were stationed within the towers to effect repairs, as the forts were constantly being bombarded and occasionally destroyed. Here you can see the result of a strong attack by the Spanish: the 1st has lost half its heavy infantry, despite their being entrenched. I had to fight on two fronts for the entire battle, and whilst directing the operations of my main forces elsewhere had to pretty much leave the 1st to hold this position without interference.
The Spanish continually attacked, but with barracks close by, I was always able to reinforce the 1st and here they watch as the 2nd Cavalry is about to charge into the enemy's rear.
'Pulling Back...' | 'to here' | 'New Position'
I had to keep advancing the 1st then withdrawing it behind the forts. Here I am ordering the artillery to move first, since they take longer to move out. The infantry cohorts are given the order to withdraw. Then they are ordered to entrench in their new position. The closer they are to the fort, the better protection it offers.
It is not difficult to trap enemy forces. The 3rd Cavalry engaged and then withdrew. In pursuit, the enemy infantry are threading north, being fired at from the towers. The light cavalry, previously unseen, will swoop in and take them in the rear. The 3rd can about-turn and join in.
The result: another defeat for the enemy, with minimal loss to the Romans.
The 4th Infantry, previously entrenched and holding a defensive line, has advanced into the flank of the enemy force. Their exposed artillery train will be destroyed with ease, although they did manage to destroy the fort in the centre of my line. Having to pause for such an extended period of time blunted their attack. Once momentum was lost, I had time on hand to make ready and position the 4th on the correct angle of advance.
Luttich has been bombarded into submission. The Roman skirmishers (light infantry javelineers) have been thrown back, and the enemy has therefore retaken the town. Care must be taken to protect the flanks of attacking legions. Trees, towns, water or any other obstacle can be used in place of troops.
The 6th swung around, pivoting upon the trees, to retake the town. Farther north, their siege factory and stables have been destroyed, robbing them of reinforcement opportunity. Any fresh troops the enemy is able to bring to bear will still be some distance away. A concerted counterattack, in either direction, was not organised. Instead their remaining reserves are being committed, without effect, in an ad-hoc fashion.
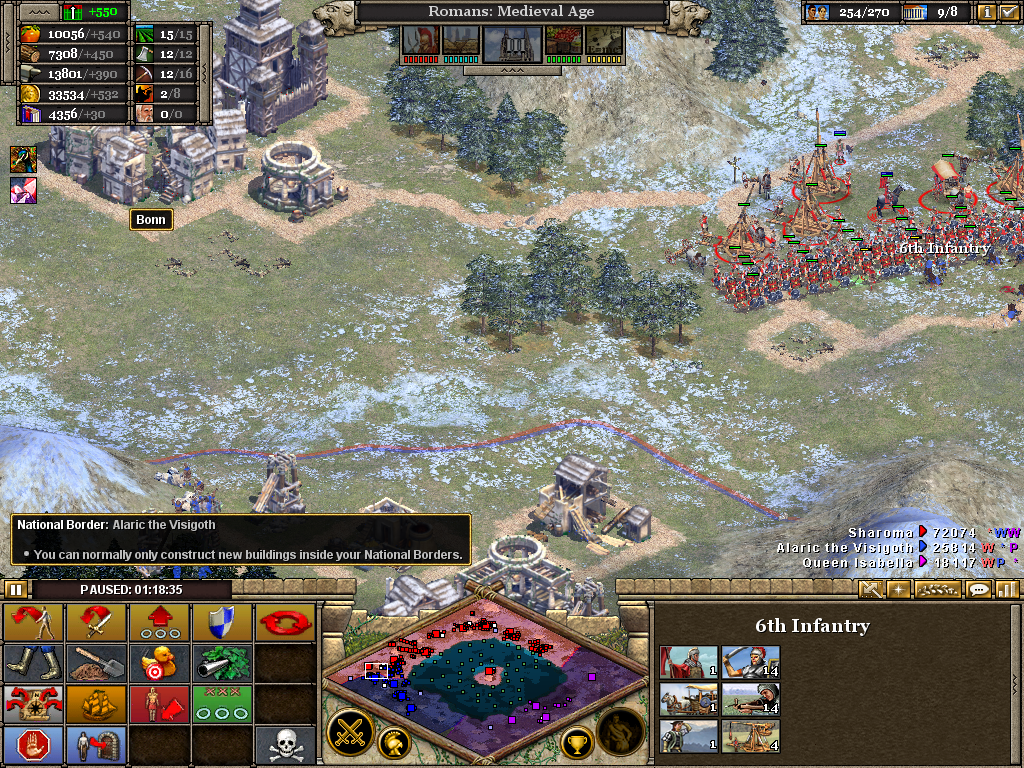
Bonn has also been taken. The 6th Infantry is guarding the road to Luttich, ensuring neither town can be cut off.
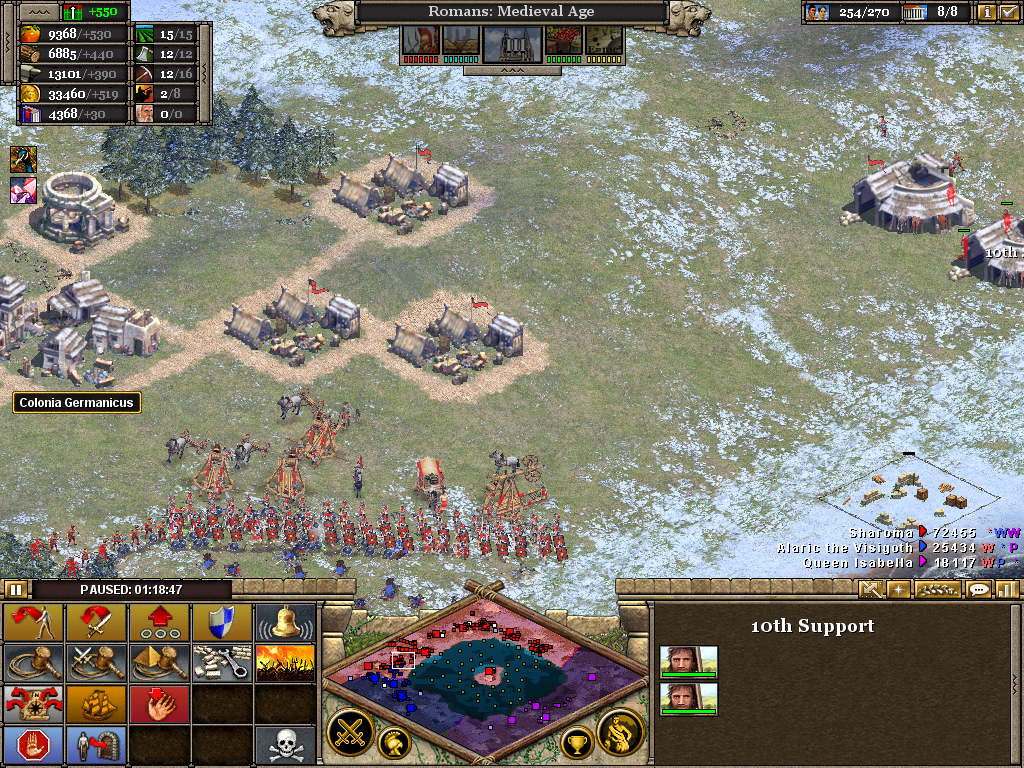
To protect the seaboard flank, and to fortify the area, a castle is being constructed at Colonia Germanicus. The enemy continues to press north, hoping to defeat the legion defending the outskirts of the town. Already barracks have been constructed and fresh cohorts are held in reserve. As soon as you capture a town, you must fortify the surrounding area and build barracks and stables. Otherwise, replacement troops will have to travel from the nearest depot, and this is wasted time. Extended supply lines can compromise a recent victory.
Since I am writing this over a year since this screenshot was taken and named, I cannot recall why I called it 'Back Forth'. However, with the 1st in action (off screen), it is necessary to wrap up operations south of Luttich and defeat the enemy forces in the sector. Careful management of the 6th Infantry has fooled the enemy - they did not know which way to face, and caught in open deployment, they will be destroyed from both sides. Perhaps the name comes from the fact that the 6th likely had to march 'back and forth' in order to strike at the exact right moment, or that I was continually switching back to the opposite front to direct the 1st (which as you can see from the minimap are heavily engaged). Either way, the enemy is about to lose yet another baggage train.
The new barracks at Colonia Germanicus have been ordered to constantly train new legions. Notice the 'infinity' icon is bright green, meaning it has been enabled. Until resources run out, new units will keep appearing. A useful feature when your attention is elsewhere, and one I highly recommend you make use of. You can also select the rally point. I usually tell them to form up where I need them most: in the rear of an active unit, or in an area on the battlefield where I want a new legion to assemble and form.
The 1st is taking moderate casualties; their right flank has taken the brunt of the enemy attack. The fort burns, about to fall. The 2nd Cavalry is activated once more to attack their artillery before it does any more damage. The enemy attack happened whilst I was conducting the battle elsewhere; the 1st did well in its fortified position, but the lack of flexibility in an entrenched position is obvious - you cannot reform to fill gaps in the first line, for instance, without losing unit cohesion.
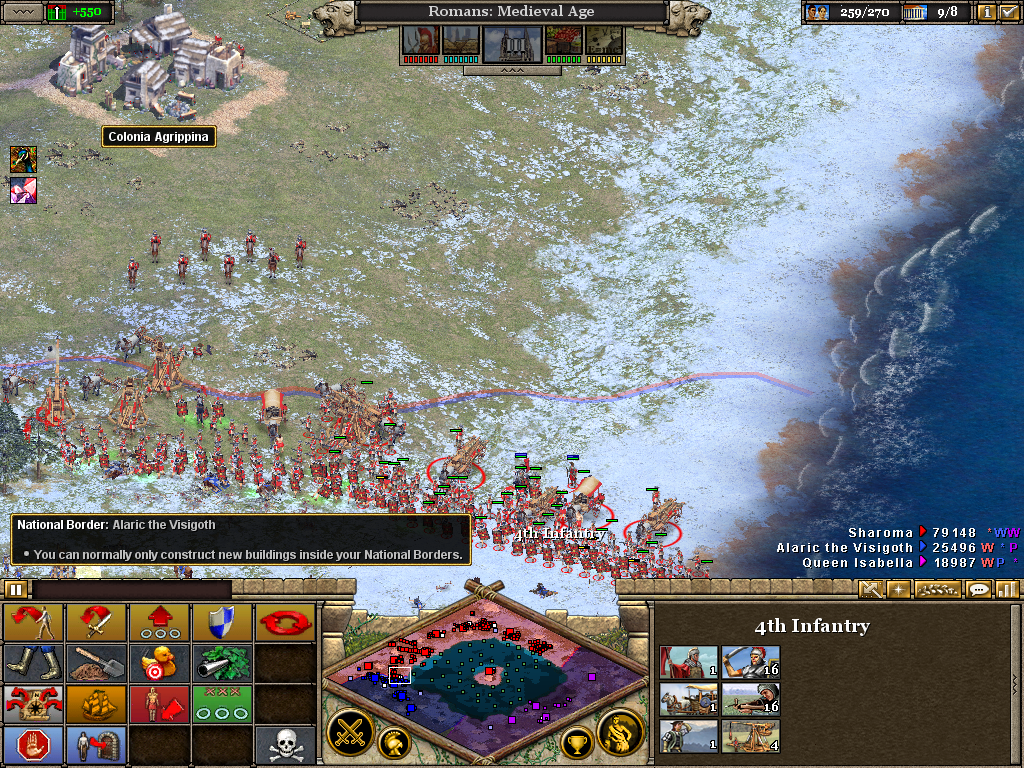
Colonia Claudia Ara Agrippinensis is now a front-line city. The 4th Infantry are tasked with securing its seaboard flank, and are doing a fine job of it; they have pushed the enemy south, passing the line which marks the Roman frontier.
The Colonia Agrippinensis is being transformed into a military city with the consctruction of a fort. This will be followed by barracks, stables and a siege factory. Heavy infantry, fresh from the Campus Martius, marches in an orderly fashion to its assigned unit. Light infantry and cavalry are also forming up in the rearward assembly areas. To the right of the Caesar's Legions is the temple; the city is known as the Colony of Claudius and Altar of the Agrippiner. Here they will pay their respects to the Divine Augustus before marching off, swords drawn, to spill blood in His name.
The battle has been on for a while now, and enough resources have been spared to form an entirely new formation. Instead of raising these troops near to the front line, they were instead ordered to assemble in Rome itself. I find that any troops formed at the front line are needed the moment they appear, as replacements for existing formations. What happened on this day, as I recall, is that this new army: at full strength with 14 heavy infantry cohorts, 14 squads of crossbowmen, 4 artillery, a general, a scout and a supply wagon, was left forgotten. I came across it and it was assigned to the south western front as the 7th Infantry. It is now marching down the Via Flaminia to its assembly point. It currently lacks its own supporting cavalry. The next number - 8th - is given to the Senator, whilst the 9th is held by a unit of light infantry, kept in reserve or tasked with border protection (they camp inside the forts). The 10th is reserved for citizens, needed to repair captured enemy towns. With an extra legion on hand, the conquest of the Germans just became significantly easier.
The 7th has arrived at Colonia Agrippina and is ordered to entrench with a front facing south, guarding the road into the town. In this sector there is now the 3rd and 5th cavalry, supporting the 4th and 6th Infantry, respectively. The 7th can act as a tactical reserve as the other two formations resume the offensive, or the three legions can be shuffled around, depending on their strengths. Likely it is that the 7th are eager to bloody their swords, lest their comrades in the 4th and 6th mock them for their inexperience and a cushy life spent in Rome.
The 4th and 3rd are attacking south, and the 6th has been ordered to begin the bombardment of the next town. For some reason their cavalry, the 5th, isn't with them, but as you can see it has been given its orders to assemble on the exposed right flank of the 6th.
The enemy spotted the exposed flank and heavy horse archers have appeared on the scene. Infantry is following but the 5th is already assembled and ready to charge.
The 1st is in action off screen but their achievements, though vital, will be overshadowed by the imminent capture of the German capital. Three legions and all their artillery have been thrown at the city. The enemy scramble but they cannot bear the strength of Roman arms.
With the defeat of the Germans, a vacuum opened up. Vast swathes of territory is there for the taking. The 4th, 6th and 7th dash forward to occupy it, spreading out their lines to cover the most area whilst maintaining contact in case an active defence is required. The 1st can now act as the pivot upon which an attack into the enemy's southern underbelly can swing. Notice the Senator is now with the main force to offer congratulations. History records that he gave a fine speech that day, reminding them that the Senate and People of Rome will never forget their sacrifice in the war against the Germans. Alaric the Visigoth is dead! Queen Isabella will be next to fall from grace.
Interlude in Africa
I can't recall the battle these two shots are taken from.
3rd Cavalry, happening upon a salt mine, is caught in an ambush and is faced with a force of mixed infantry, all determind. The only route of retreat is through enemy territory.
A glorious snapshot in time of two legions being led across a river by the Senator.
Campaign in Africa
The following screenshots are taken from the same battle as this video.
The western approach to this fort is blocked, but artillery can still fire at it. The map is still being explored. I am on my guard, trying to fortify my perimeter and keep it guarded with as few troops as possible.
Watchtowers are extremely useful if you cannot afford the time or resources to probably fortify an area. They can see very far and will at least afford you some time to prepare a mobile defence. As you can see from the minimap, 'light' (visibility) is being shone on strategic areas to keep an eye on all the approaches to my capital city.
A forward operating base is now functional. The Terracotta Army supplies javelineers, and the first legion is already entrenched guarding the centre. The Senator is facing east, watching in the distance the construction of Roman towns and the mobilisation of Roman citizens into fighting troops. The Egyptians and the Germans decide to declare war together; the time will come when they will pay for their insolence.
The 4th Infantry took up a position on the high ground, and from there they can fire their arrows. The enemy are caught with only one way to attack, up a hill and around a tight corner, by which time the 4th can wheel and redeploy. The 3rd, however, is about to charge their flank and hopefully wrap up this first enemy attack. Elsewhere, the Germans are probing the Eastern Front.
The enemy decided to find an alternate route, in an attempt to take the 4th in the rear. However, light infantry are already taking up a garrison position within a fort, and are able to attack without fear of reprisals. That is, unless artillery can be brought to bear. The 4th are told to maintain their position, although it looks as if the enemy has disengaged and is regrouping for a fresh assault along another axis.
A textbook example of shadowing: this force of German barbarians invaded Roman territory along my exposed left flank, but I kept an eye on them, and assigned the 1st to take up a position to their rear; the general gave the 'cloak' order at times when exposure was imminent. The Germans deployed hither and thither, before deciding to attack Rome and hopefully take it by surprise. However, having positioned the 1st ideally, I then gave the order for a charge at high seed (again, via the general) and into their rearward ranks the legions did plunge. As you can see, their artillery and baggage train - a significant proportion of their forces - had deployed, ready to begin siege operations, and no troops were tasked with guarding it. By the time they can organise their infantry properly, the battle will be won. Note that the 2nd Cavalry kept a constant vigil, lest the 1st should find itself outflanked.
The Germans found hard but their entire force was wiped out. Roman casualties were not insignificant, however.
The Germans, perhaps wishing to wash away the shame of defeat, immediately despatched another force, albeit a smaller one. They could be in a position to turn the 1st's flanks, but at the moment are content to frighten the citizens of Caesaraugusta.
The minimap displays the Roman incursion into enemy territory. By seizing this town I split the Egyptian holdings almost in two, but due to a stretched line of supply, the attack stalled. The enemy then counterattacked, retaking the ground to the south it had previously lost; two legions find themselves cut off. Renaming the settlement was perhaps premature; a mission to reopen the supply line is a priority. The building of a temple will increase the town's border push.
Roman territory has been expanded to better reach the new town.